Design to code
Design to Code in 2026: Four Mechanisms, What Each One Preserves, and How to Test Fidelity Yourself
Rule-based export, screenshot-to-code, structured design data and prompt-to-app generators each keep different parts of a design. Here is what is documented about each, and a test you can run.
· Diagram Studio Editorial
Direct answer
Design to code tools use one of four mechanisms: rule-based export that translates layer properties, screenshot-to-code where a vision model reads pixels, structured design data such as Figma's MCP server with Code Connect, and prompt-to-app generators that treat a design as context. Each preserves what its input contains and guesses the rest. A screenshot diff tests only visual fidelity.
Four mechanisms, four different inputs
Design to code tools look interchangeable in a listicle, but they do different jobs because they read different things. There are four mechanisms in use as of October 1, 2026, and the input each one reads decides what survives into the code.
- **Rule-based export and plugins.** Fixed rules translate the properties of each layer (size, fill, Auto Layout settings) into HTML, CSS or native code. No model is required.
- **Screenshot-to-code.** A vision-capable AI model looks at an image of the design and writes code that tries to reproduce it.
- **Structured design data.** An AI coding agent asks the design tool for the layer tree, variables and component mappings through an interface such as Figma's MCP server, then writes code that follows them.
- **Prompt-to-app generators.** An AI agent writes a working app from a written request. A design can be attached, but it is context for the agent, not a specification it must match.
MCP stands for Model Context Protocol, an open protocol that lets an AI client call tools exposed by a server. Here, the server is the design tool and the client is an editor or coding agent.
| Mechanism | Reads | Tends to preserve | Tends to lose | Suits |
|---|---|---|---|---|
| Rule-based export | Layer properties and Auto Layout (documented) | Exact values, hierarchy, layer names (documented for one plugin) | Behaviour, states and responsiveness the file does not encode (inference) | Single components, measurements, clean files |
| Screenshot-to-code | Pixels of one image (documented) | What a person sees at that one size (inference) | Tokens, names, other breakpoints, hidden states (inference) | No design file available; legacy or third-party UI |
| Structured design data | Layer tree, variables, screenshots, component mappings (documented) | Component identity, token names, text (documented) | Anything the file lacks; the agent's own output is unchecked (reported) | Teams with a design system in code |
| Prompt-to-app | A written request plus optional attached design (documented) | Intent and speed (inference) | Fidelity to a specific frame; stability across iterations (inference) | Prototypes and throwaway apps |
Tools often combine routes. Figma Make takes prompts and attached designs; an open-source screenshot tool also accepts Figma designs. This article classifies by what does the work of turning design into code, not by the product label.
What “fidelity” has to mean before you can test it
People say a tool is faithful when the page looks right. That is one of three separate things, and the mechanisms differ on all three.
- **Visual fidelity:** the rendered page matches the frame at a given size.
- **Structural fidelity:** the code uses your components, tokens and naming instead of one-off values.
- **Behavioural fidelity:** responsive layout, hover, focus, disabled and loading states, and interaction work as intended.
A screenshot diff can only score the first. The rest of this article describes each mechanism against all three, then gives a test that covers the first directly and the other two with simple checks.
Rule-based export and plugins: deterministic, and only as good as the file
This is the oldest mechanism. In Figma's Dev Mode, selecting a layer fills an inspect panel with autogenerated code snippets for it, and the Dev Mode guide describes the snippets as customizable and extendable with plugins. A Figma post from August 22, 2023 lists CSS, Android XML and iOS UIKit among the code options and says nearly 80 codegen plugins existed in the community at that time. Treat the plugin count as dated.
Plugins such as Anima go further and export whole screens. Anima's documentation says frames and Auto Layout become HTML with Flexbox or Grid, that Figma variables are converted to CSS custom properties, and that meaningful layer names become component and class names. It also says designs using Auto Layout convert to cleaner, more maintainable code.
The consequence is stated indirectly by that guidance and follows from how rules work (inference): the output is repeatable, and its quality is a function of file hygiene. A layer called “Frame 427” produces a class name to match. A card built with fixed positions instead of Auto Layout has no layout rule to translate, so a responsive result is unlikely.
What this route loses is whatever the file never recorded. A static frame contains no data about validation, loading, or what happens on click. Those come from a developer.
It suits one-component handoffs, spacing and typography lookups, and teams that already keep Figma files tidy. It is a weaker fit when the target is your own component library, because nothing in the rules knows that library exists.
Screenshot-to-code: the vision model sees pixels and nothing else
Here the input is an image. A vision-language model describes what it sees and writes code to reproduce it. The open-source screenshot-to-code project says it converts screenshots, mockups, Figma designs and screen recordings into code, with output stacks including HTML with Tailwind, React with Tailwind and Vue with Tailwind. It needs at least one API key from OpenAI, Anthropic or Gemini, and it describes running local open-source models through Ollama as not recommended because of poor-quality results (as of October 1, 2026).
The strongest evidence on this mechanism is academic and dated. The Design2Code benchmark (Si et al., NAACL 2025; first posted March 5, 2024) used 484 manually curated real webpages and found that models “mostly lag in recalling visual elements from the input webpages and generating correct layout designs.” It tested the frontier models of early 2024, so current models may do better. No equivalent published number is cited here for 2026 models.
What this route preserves is limited to what is visible at the captured size (inference). It loses everything that is not a pixel: the token behind a color, the component a button instantiates, the layout at other widths, the hover state nobody drew. Colors and spacing are estimated, not read.
Its real advantage is that it needs no design file. A competitor’s page, a legacy screen or a hand-drawn mockup can all be inputs.
A screenshot comparison is also useful as a loop around any route. Anthropic’s Claude Code documentation includes an example prompt that pastes a screenshot, asks for the design to be implemented, then asks the agent to screenshot its result and list the differences. That turns a one-shot guess into an iterative check, though the check is still pixel-level.
Structured design data: Figma’s MCP server and Code Connect
In the third mechanism the agent never has to guess from pixels, because the design tool hands it structure. Figma announced its MCP server in a June 4, 2025 beta post, describing it as bringing Figma into the developer workflow so that LLMs achieve design-informed code generation.
The tools reference documents what comes back. get_design_context returns design context for a selection, in React with Tailwind by default with a customizable framework. get_metadata returns a sparse XML outline of layer IDs, names, types, positions and sizes. get_screenshot returns a PNG, and get_variable_defs returns the variables and styles used. Tools for Code Connect mappings sit alongside them.
Access has conditions. The server overview recommends the remote server and says only clients listed in the Figma MCP Catalog can connect. The reference adds that selection-based prompting works only with the desktop server; the remote server needs a link to a frame or layer.
Code Connect is the part that addresses structural fidelity. Figma’s help center calls it a bridge between your codebase and Dev Mode, connecting components in your repositories to components in your design files. When the MCP server processes a frame containing connected components, the integration page says it generates CodeConnectSnippet wrappers carrying design properties, import statements and usage code. Two ways of setting it up exist: CLI mappings with hand-written snippets, and UI mappings that generate snippets from component names and properties.
| Item | What the documentation says |
|---|---|
| Plan | Available on the Organization and Enterprise plans |
| Seat | Requires a Full or Dev seat |
| GitHub | GitHub Enterprise Server is not supported; one GitHub repository per Figma library file |
| UI vs CLI | Components connected with Code Connect UI do not display code snippets in the Inspect panel; CLI connections can only be edited through the CLI |
| Variables | get_variable_defs returns existing tokens; it cannot create new ones (MCP tools reference) |
Although Code Connect provides component advice, the AI can still “creatively” generate one-off styles for margins or colors when it encounters something not explicitly in the map.
That is a reported limitation, dated July 3, 2025 in the original post, and it matches the logic of the mechanism (inference): mappings cover the components you connected, and the agent still writes everything else. The same post says the developer carries the burden of checking every output visually. The structure improves what the agent is told. It does not show the agent what its own code renders as.
Prompt-to-app generators: the design becomes a suggestion
Prompt-to-app tools start from a written request and produce a running app. Figma’s help center describes Figma Make as an AI-driven prompt-to-app tool that brings ideas and existing Figma designs to life as functional prototypes, web apps and interactive UI. Code export is available to Full seat users, and Dev, Collab and View seats can export code only in drafts.
Designs go in as attachments. The attachment guide says up to 10 files can be attached per prompt, and warns that with many images, SVGs or vector illustrations the agent can sometimes struggle, suggesting you scale back image fidelity or use a less content-rich attachment.
Vercel’s v0 documentation describes it as an agent that helps create real code and full-stack apps, with high-fidelity UIs from wireframes or mockups and page cloning from screenshots or Figma files. The page we read states capabilities and contains no statement of limitations, which is itself worth knowing: absence of a documented limit is not evidence of none.
What this mechanism preserves is intent and speed. What it gives up is a guarantee about any particular frame, because the model is free to reinterpret. Iterating by prompt can also change parts you did not mention (inference, from how generation works; no vendor source cited). For that reason this route benefits most from a regression check, the same kind of diff used in the test below.
It suits prototypes, internal tools and exploring layout ideas. Using it for a pixel-specified marketing page mismatches the tool and the job.
Choosing by what must survive
Start from the input you actually have and the property you cannot afford to lose. The pairing below is our inference, not a vendor ranking.
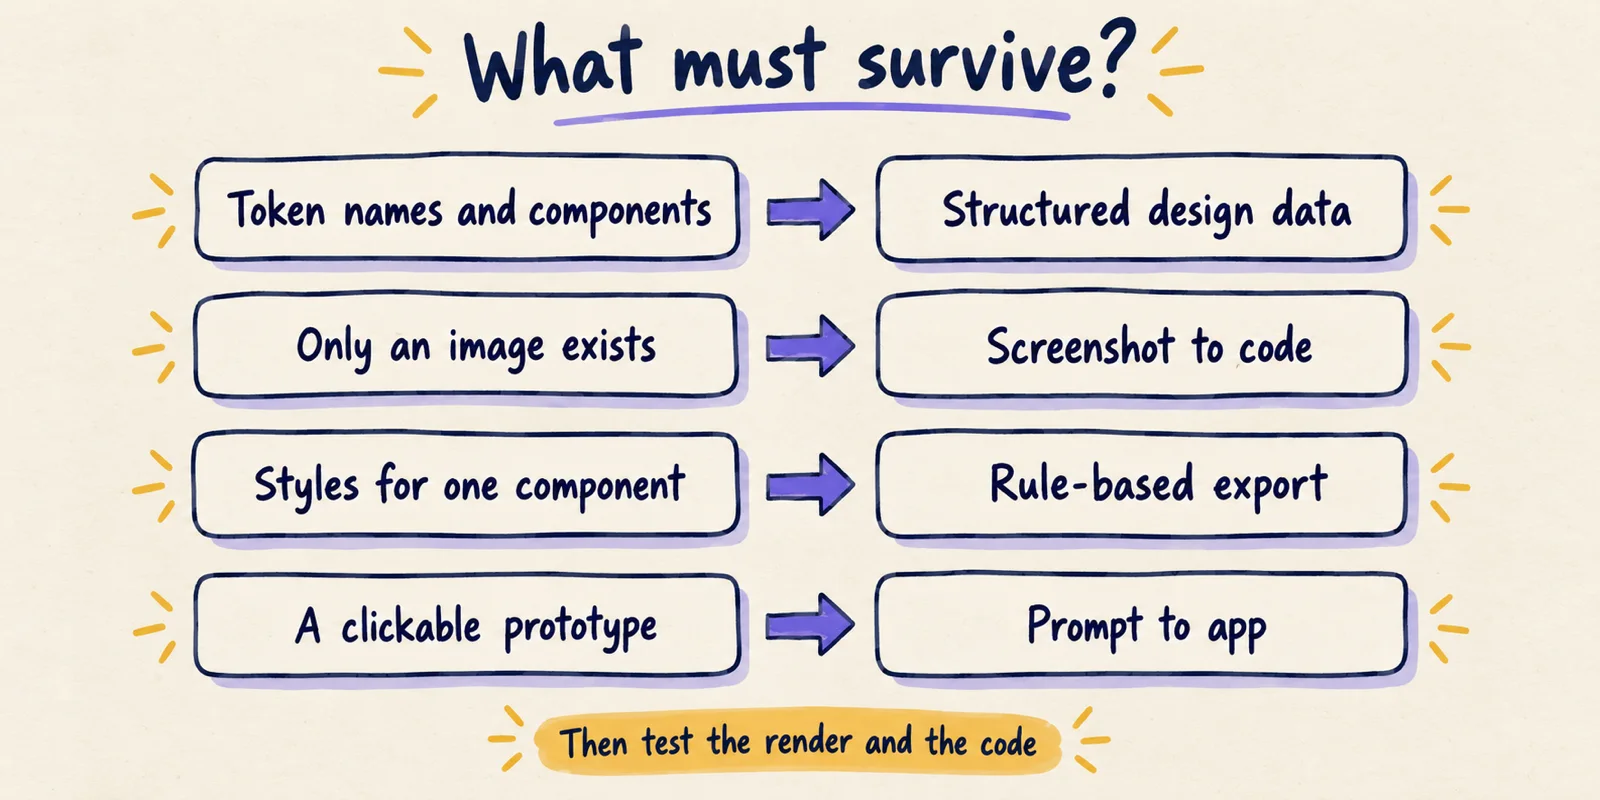
- **Token names and your own components must appear in the code:** structured design data with Code Connect, accepting the plan and seat requirements above.
- **You have only an image:** screenshot-to-code, with a comparison loop around it.
- **You need styles for one component:** rule-based export from a tidy file.
- **You need something clickable by tomorrow:** a prompt-to-app generator, and plan to rebuild what matters.
These are not exclusive. A reasonable pipeline uses structured data for components, rule-based export for one-off measurements, and a screenshot comparison as the final gate on all of them.
A fidelity test you can run on your own frames
No published benchmark covers your design system, so run your own. The method below uses Playwright’s built-in screenshot assertion. It is a protocol, not a result: the editorial team has not run these tools, and nothing here reports a measurement.
Playwright’s toHaveScreenshot() compares a rendered page with a stored baseline image. Documented defaults as of October 1, 2026 (assertions reference): threshold is 0.2 (a perceived color difference in YIQ space, from 0 strict to 1 lax), maxDiffPixels and maxDiffPixelRatio are unset, and animations is "disabled".
- **Pick three to five frames of rising difficulty:** a button set with all states, a form, a dense card or table, and one full page drawn at two widths.
- **Export a reference PNG for each frame** at 1x scale and the exact frame width.
- **Run each frame through every candidate route** and save the generated code unmodified. Keep a note of the prompt, model and settings used so the run can be repeated.
- **Pin the environment.** Use one OS, browser, installed fonts, a fixed viewport equal to the frame width and a device scale factor of 1. Playwright’s documentation warns that rendering varies by host OS, settings, hardware and headless mode, and advises running in the same environment that produced the baseline.
- **Mask content that should differ,** such as dates, avatars or random data, with the
maskoption, and leaveanimationson its default. - **Run two comparisons.** First, compare the render to the design export with a loose tolerance, for example
maxDiffPixelRatioof 0.02, because Figma and a browser rasterize text differently. Second, accept the best render as the baseline and rerun after every later change with a strict tolerance, to catch regressions. - **Score the code, not only the picture.** Count hard-coded color and spacing values against token references, check that your components were imported rather than recreated, resize to a second width, and screenshot hover, focus and disabled states.
- **Record edits-to-fix.** For each frame and route, note how many minutes a developer needed to make it shippable. This is the figure that decides the choice.
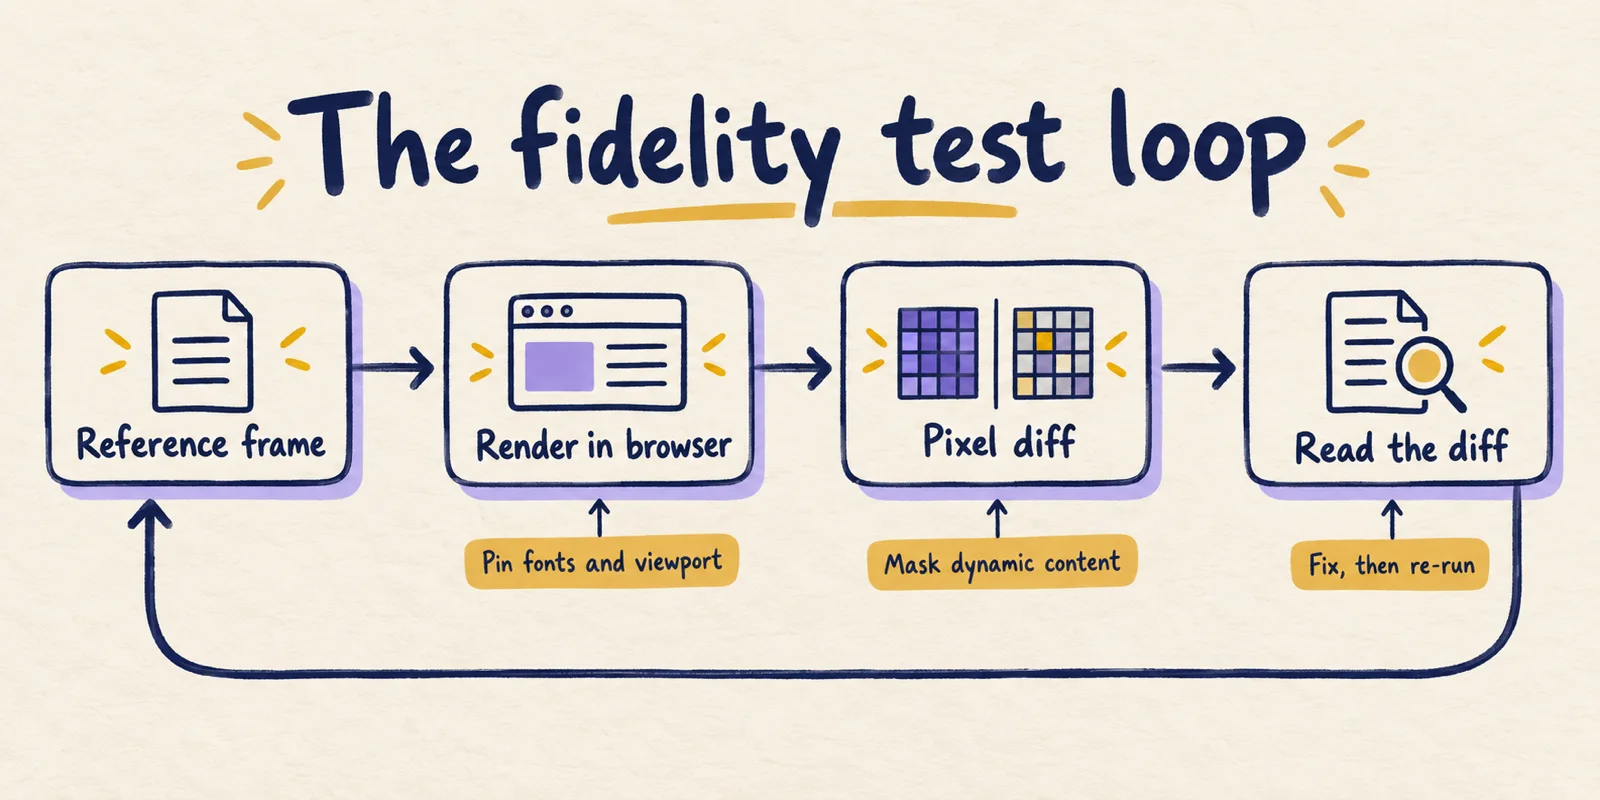
Browser rendering can vary based on the host OS, version, settings, hardware, power source (battery vs. power adapter), headless mode, and other factors.
A scoring sheet with one row per frame and route, and columns for diff ratio, hard-coded values, components reused, states present and edits-to-fix, is enough. Three frames and three routes give nine rows, which is a realistic afternoon.
Reading the results, and what a pixel diff cannot tell you
Expect the render comparison to look good for every route. That is a prediction from published research, not from our own runs. The Figma2Code benchmark (Gui et al., ICLR 2026; submitted April 15, 2026) built 213 design-code pairs from Figma community files and benchmarked ten models.
while proprietary models achieve superior visual fidelity, they remain limited in layout responsiveness and code maintainability.
If visual fidelity is what models do best, a single-viewport diff is the easiest test to pass and the least informative. The useful differences show up in the second layer of the protocol: the second width, the state screenshots and the token count.
Three cautions apply when interpreting your table.
- **A low diff does not mean good code.** A page can match a frame while hard-coding every value and recreating a component you already own.
- **A high diff is not always a failure.** Differences in font rendering or image scaling can push a faithful result over a strict tolerance, which is why the first comparison uses a loose one.
- **Small samples mislead.** Three frames show where a route breaks, not how often. Treat a clean sheet as absence of an obvious problem, not as proof.
Results also age. Models, plugins and server tools change often, so rerun the sheet when you change tool, model or design-system version.
Pick the route by what must survive, then test render and code separately
Design to code is not one capability with four brands. It is four mechanisms that read different inputs, and each one preserves what its input contains: layer rules for exported values, pixels for the visible result, structured data for names and components, a prompt for intent. Everything else is guessed or lost.
So the choice starts with the property you cannot lose, and the verification has two layers. A screenshot diff checks the render at one size and is the easy layer. A short scan of the code for tokens, reused components, responsive behaviour and states checks the layer where the routes diverge.
Run that protocol on three of your own frames before standardising on a tool. Vendor documentation tells you what a route can read; only your frames tell you how much of it survives, and the cost of fixing the rest.